Root External 2 Internal SD – APK Download – Use SD Card as Internal
Android Smartphones have a lot of really useful features that other Smartphones don’t provide. One of those features is the ability to expand the storage using a Micro SD Card. While it is a really useful feature, Android doesn’t use the SD Card as primary storage by default. To fix this problem and swap internal storage with SD Card comes in the Root External 2 Internal SD App. As the name of the app suggests, you can replace your Android phone’s internal storage with the MicroSD card and make it the primary storage location.
Root External 2 Internal SD APK Download and Tutorial
As good as it sounds, just like any solution Root External 2 Internal SD comes with its own advantages and disadvantages. Other than being a ‘Root Only’ app, it is also not very user-friendly. Don’t worry, I got your back. I will be providing you the Download link for the APK file and I will also guide you step-by-step how to use it.
APK Download Link:
Root External 2 Internal SD App was available in the Google Play Store but unfortunately, it got removed for some reason. But other than iOS, Android allows you to install apps from sources other than Google Play Store. That is exactly what we will be doing here. You will need to download the APK file from the link given below and then we will install it.

- Also read: How to play PS2 Games on Android without root
- How to play 2 Clash of Clans games in Android without root
How to install Root External 2 Internal SD
The installation is just like any other app installation on Android. I never assume that my readers have read my other tutorials so I will start from the basics. Just so no one is left behind. If you know how to install APK file, feel free to install it and skip the installation part of the tutorial.
Before I show you how to Install it, let me highlight to you that you can only use this app with a rooted phone. If you don’t have root, check this tutorial and get your phone rooted.
- Android has a little setting that prevents App installations from external sources like an APK file. First, we will have to turn that setting OFF. For that, open Settings and navigate to Security section. Here you will need to look for an option called “Unknown Sources”. Make sure that is it enabled and if it is not enabled then tap on it and enable it.

- Now you will need to download the APK file for Root External 2 Internal SD app from the link given above. If you have already downloaded it then skip to the next step.
- Open the APK file from the “Downloads” app or File Manager and press the “Install” button. The installation will begin and within a couple of seconds, you will see Installation Complete screen.
- Next, you will need to Open the Root External 2 Install SD app from the app drawer and follow the instructions given below for the usage of this app.

How to use?
As I already mentioned in the intro of this tutorial, it is not a user-friendly app and you will need to do some fiddling around to get it working. Before we proceed, let me warn you that only you will be responsible for all of your actions. Neither I nor revkid.com will be responsible for bricked phones, dead SD Card or any other type of damage that may happen to your phone.
Make sure that you have a recent backup of your android phone saved on your PC or somewhere safe before you proceed. If your phone get’s bricked and you don’t have any backup, it would not be easy to bring it back to life. Lets start.
- Open the Root External 2 Internal SD app on your Android phone and the first time it will ask you for root access. You will need to press the “Grant” or “Allow” button on the root permission pop-up.
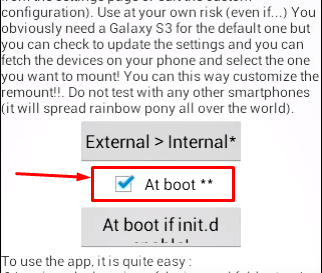
- Once you are in the app, you will need to double-check some setting and make sure that they are in place. First of all, you will need to see that the “at Boot” box is checked as shown in the image below.

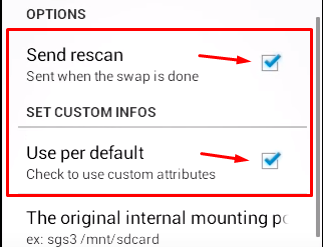
- After that open setting of the app and check mark the “Send rescan” and “Use per default” options. By default, all these options are enabled as they should but it is always a good practice to verify before proceeding.

- In settings, under the “Use per default” option, you will see Original Mounting points for both internal as external storage for your Android phone. You don’t need to change them as the app detects these options automatically.
- The only thing you will need to change and fiddle around with is the option called “The Ext. sdcard device access”. You will need to enter the mounting point of your SD Card in this setting to make this app work.
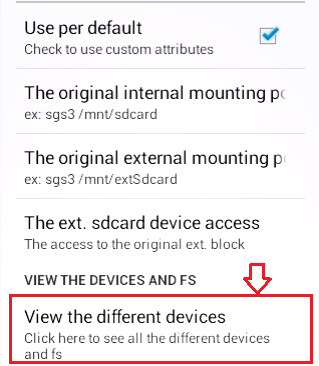
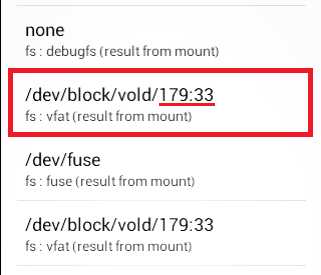
- Press the “View the Different Devices” option from settings and scroll down. This will show you a bunch of options.

- All you have to do is look for an option that starts with this, “/dev/block/vold”. The only thing that you will need to take a note of is the last numbers after vold/ You can see the image given below for better understanding.

- The last step is to scroll back up and click the “The Ext. sdcard device access” option and enter the path you noted in step 7. Keep in mind that every device path varies and that is the reason why I have not mentioned a universal path for every android phone.
Now you can go back to the main screen of “Root External 2 Internal SD” app and click the “External > Internal” button to make the swap. If everything worked well, you should be able to see your SD Card as the Internal storage inside Settings.
Conclusion:
To conclude I can say that it is a very tricky task but if you do it by exactly following the instructions then you can get success in it. The Root External 2 Internal SD app is an excellent piece of software for those who are willing to take a risk. If you were able to swap internal storage of your Android phone with the SD Card then make sure to share it with your friends. You can also follow us on twitter for more updates like this. Feel free to ask if you have any questions in mind and I will get back to you as soon as possible.