How to install Dark Mode on iOS 11 without computer – Eclipse 4
The most annoying thing that iOS has is all white UI. We all have had that time when you are using your iPhone is pitch black room but the white user interface of iOS is hurting your eyes. Well, not anymore. Today I will show you how to install Eclipse 4 Tweak on your iOS 11 device without a computer. Essentially, we are going to install dark mode on an iPhone using Electra Jailbreak. If you have not yet jailbroken your iPhone, although I will show you how to do it today again, you can find a full detailed tutorial here.
Dark mode on iOS 11 without a computer?
Basically, this is what we will be doing. I will show you how to jailbreak your iPhone, iPad or iPod touch running iOS 11. Next, we will download the tweak files and other apps that are needed to complete this installation. And at the end, I will show you how to install the Dark Mode on iOS 11 using Eclipse 4.
Disclaimer:
Before we begin, I want to tell you that this tutorial is not meant for the faint of heart. Following this tutorial is completely up to you. We will be jailbreaking the iPhone for this tutorial and it will void your warranty. And if you did anything wrong, even by 1 symbol, your iPhone will break and you will need to restore using iTunes. It is highly recommended that you take a complete backup of your iOS Device before proceeding.
Installing Electra Jailbreak:
If you already have installed Electra Jailbreak using my previous tutorial, you can skip this section and continue from the next part of app installation.
I will be using ‘iPhone’ throughout this tutorial, just because it is easier than naming all three variants of iDevices. Just keep in mind that this method works for all devices running iOS 11.1.x and 11.2.x.
- First of all, open Settings of your iPhone and navigate to the Safari settings. Here you will need to clear the browser data and history. This step is not necessary but it will help keep things flowing without any issues.
- Now open this link in the Safari browser and wait for a few seconds. You will see an ad that you will need to skip. Press the skip ad button from one of the corners and open the Apps tab.
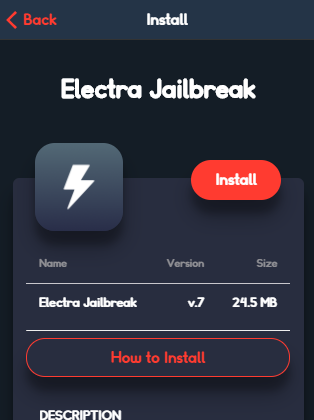
- Next, navigate to the Tweakbox apps and look for Electra Jailbreak app. Open it and press the red Install button on the next page.

- Wait for a couple of seconds and you will see a pop-up. Press the Install button on the popup and go back to the home screen.
- You will notice that there is a new app being installed on the home screen. This is the Electra Jailbreak installer. wait for the installation to be complete.
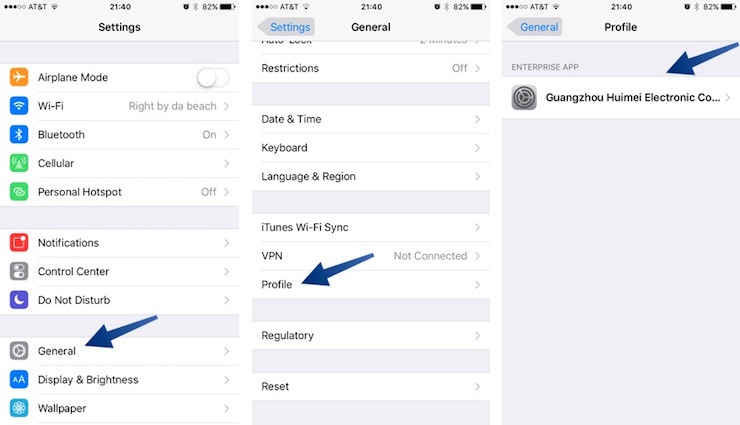
- After the app is installed, you will need to manually allow access to this app by going into Settings > General > Profiles. Here you will find a developer profile which is hosting Electra Jailbreak. Just allow access to this profile by pressing the Trust button.

- Now open the Electra jailbreak app and press the Jailbreak button and your iPhone will restart after a few seconds. Congratulations, Now you have successfully jailbroken your iOS 11 device.
Installing essential apps for the Installation of Eclipse 4:
Now that you have jailbroken your iPhone, let’s install some important apps. The first one being the FilzaEscaped. Again, I have a full tutorial on this one as well but I will show brief installation here. We will also need to download the ZipApp Free App from the AppStore. This will be needed to extract the Tweak files. Direct app store download link for ZipApp Free is given below.
![]()
To install the FilzaEscaped, you will need to open the Tweakbox website again. Navigate to the Apps tab and open Tweakbox apps section. Here you can find the FilzaEscaped from the list and install it using the red install button.
Download Eclipse 4 files:
The last thing to download is the Eclipse 4 tweak files. This is the last download, I promise. I have provided the direct download link for the tweak files. All you have to do is click the link given below using Safari on your iPhone and wait. It will take some time for the download to complete but you will have to wait patiently. Don’t close Safari browser.

Installation:
Let’s start the installation of Eclipse 4 from the download of the tweak files. Assuming that you have followed this tutorial completely till now, you should now have a screen where you can open the Eclipse 4 archive in any app.
- From the open in app page, you will need to select Open in ZipApp Free option. If you don’t have it as the default option, press the More… option and select ZipApp from the list of apps.
- When it opens the ZipApp, it will ask if you want to unarchive the file. Press Unarchive button and you will get a new blue-colored folder.
- Open the folder and you will see a couple of files. Here, you will first need to extract the Eclipse archive. It is the file that has eclipse4 in its name. Simply tap the file and it will ask if you want to extract it. Click Unarchive and it will do it for you.
- After the extraction is complete, you will have a new blue folder. Enter the blue folder and select data.tar.lzma file. It will again ask for the extraction permission, press Unarchive button and wait for a few seconds.
- Now you will have a new folder called data. This is where the job of ZipApp completes. Close it and move to the FilzaEscaped app.
- Open the FilzaEscaped app and wait for a few seconds. You will get a fullscreen ad that you will need to skip. Press the skip button from the corner of the screen and proceed to the next step.
- Press the Start icon from the bottom of the screen and open Apps manager. If you get the Activate pop-up, press the Activate button and press Done.
- Select ZipApp from the list of apps and open Documents folder. Navigate to the Imported Files directory and here you will find all the files that you extracted earlier.
- Now you will need to navigate to this path. open data/Library/MobileSubstrate/DynamicLibraries/ Here you will find a list of files. All of these files will go to the SBInject directory on your iPhone.
- Press the Tabs button from the bottom right of the screen and press the + icon from the center of the bottom bar.
- On this new tab, we will need to go all the way back to the root directory. Keep pressing the back button from the top-left until it disappears and you land in the / directory.
- Here, navigate to this path. /bootstrap/Library/SBInject. Now press the tabs button again and go back to the previous tab which has the Eclipse4 Files.
- Now, this is the most tedious task of the whole installation. You will need to Edit the folder and copy all of the files, one by one, to the SBInject folder. And then Change the permissions of all files by pressing the i button, open the Sticky section and change the Mask value to 0777. Do this for all of the files and then respring your iPhone.
- After copying all of the files from DynamicLibraries folder to the SBInject folder and changing the permissions to 0777, you will need to perform some other steps as well. Come out of DynamicLibraries folder and copy the Switches folder. I want you to copy the folder completely. Now paste this folder to the /Library directory. Don’t forget to change it’s permission as well to 0777.
- Now copy and paste the Activator folder to the same /Library directory and change it’s permissions as well.
- Lastly, we will need to deal with the PrefrenceLoader and PrefrenceBundles. Open the PreferenceLoader from the tweak files and open the preferences folder. Here you will find a file called Eclipse_Settings.plist. I want you to copy this file and paste it to the /bootstrap/Library/PreferenceLoader/Preferences/ and past the file here. Change it’s permissions as well.
- Do the same for PreferenceBundles as well but make sure to paste the file inside the PreferenceBundles folder and not the PreferenceLoader folder.
Video Walkthrough:
Even though I have tried to list all the steps in complete details, there is a change that I might have missed something. Here is a complete video tutorial by DinoZambas2 which guides you through the process a lot quicker.
That’s it for this quick tutorial, I hope that you found this tutorial helpful and you were able to install dark mode on your iOS 11 devices without cydia using Eclipse 4 tweak. If you liked what you read than don’t forget to share it with others and follow us on twitter for more updates.